本文讲新睿云GPU加速云服务器,利用Deepo搭建深度学习环境!
一、安装nvidia-docker:
本文是系列文章
上篇请查看《gpu云服务器使用Docker部署深度学习环境(上)》
中篇请查看《gpu云服务器使用Docker部署深度学习环境(中)》
下篇请查看《gpu云服务器使用Docker部署深度学习环境(下)》
单独安装Docker之后还无法使用带GPU的深度学习机器,需要再安装一下英伟达出品的Nvidia-docker。
1.安装:
# Add the package repositories
$ distribution=$(. /etc/os-release;echo $ID$VERSION_ID)
$ curl -s -L https://nvidia.github.io/nvidia-docker/gpgkey | sudo apt-key add –
$ curl -s -L https://nvidia.github.io/nvidia-docker/$distribution/nvidia-docker.list | sudo tee /etc/apt/sources.list.d/nvidia-docker.list
$ sudo apt-get update && sudo apt-get install -y nvidia-container-toolkit
$ sudo systemctl restart docker
2.测试:
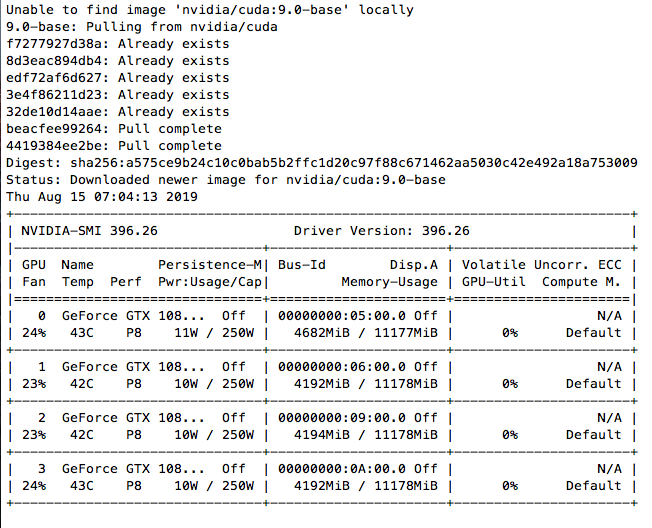
现在可以测试了,以下是在一台4卡1080TI机器上的测试结果,宿主机CUDA版本为9.2:
docker run –gpus all nvidia/cuda:9.0-base nvidia-smi
第一次运行的时候结果大致如下,需要从官方镜像拉取:
测试
完整用法可以参考nvidia-docker官方github:
#### Test nvidia-smi with the latest official CUDA image
$ docker run –gpus all nvidia/cuda:9.0-base nvidia-smi
# Start a GPU enabled container on two GPUs
$ docker run –gpus 2 nvidia/cuda:9.0-base nvidia-smi
# Starting a GPU enabled container on specific GPUs
$ docker run –gpus ‘”device=1,2″‘ nvidia/cuda:9.0-base nvidia-smi
$ docker run –gpus ‘”device=UUID-ABCDEF,1′” nvidia/cuda:9.0-base nvidia-smi
# Specifying a capability (graphics, compute, …) for my container
# Note this is rarely if ever used this way
$ docker run –gpus all,capabilities=utility nvidia/cuda:9.0-base nvidia-smi
二、测试Tensorflow Docker镜像
几乎所有的深度学习框架都提供了Docker镜像,这里以Tensorflow Docker镜像为例,来玩一下 Tensorflow,Tensorflow Docker的版本是通过Docker Tag区分的:

Tensorflow Docker
1.默认拉取的Tensorflow镜像是CPU版本:
docker pull tensorflow/tensorflow
运行bash:
docker run -it tensorflow/tensorflow bash

Tensorflow
现在可以在Tensorflow Docker下执行python,可以看得出这是CPU版本的Tensorflow:
|
root@ed70090804e5:/# python Python 2.7.15+ (default, Nov 27 2018, 23:36:35) [GCC 7.3.0] on linux2 Type “help”, “copyright”, “credits” or “license” for more information.>>> import tensorflow as tf>>> tf.__version__’1.14.0′>>> sess = tf.Session(config=tf.ConfigProto(log_device_placement=True))2019-08-15 09:32:38.522061: I tensorflow/core/platform/cpu_feature_guard.cc:142] Your CPU supports instructions that this TensorFlow binary was not compiled to use: AVX2 FMA2019-08-15 09:32:38.549054: I tensorflow/core/platform/profile_utils/cpu_utils.cc:94] CPU Frequency: 3598085000 Hz2019-08-15 09:32:38.550255: I tensorflow/compiler/xla/service/service.cc:168] XLA service 0x556fa8e5dd60 executing computations on platform Host. Devices:2019-08-15 09:32:38.550282: I tensorflow/compiler/xla/service/service.cc:175] StreamExecutor device (0): <undefined>, <undefined> Device mapping: /job:localhost/replica:0/task:0/device:XLA_CPU:0 -> device: XLA_CPU device2019-08-15 09:32:38.551424: I tensorflow/core/common_runtime/direct_session.cc:296] Device mapping: /job:localhost/replica:0/task:0/device:XLA_CPU:0 -> device: XLA_CPU device |
2.获取GPU版本的Tensorflow-devel镜像:
docker pull tensorflow/tensorflow:devel-gpu
运行:
docker run –gpus all -it tensorflow/tensorflow:devel-gpu
这里有报错:
docker: Error response from daemon: OCI runtime create failed: container_linux.go:345: starting container process caused “process_linux.go:430: container init caused /”process_linux.go:413: running prestart hook 0 caused ///”error running hook: exit status 1, stdout: , stderr: exec command: [/usr/bin/nvidia-container-cli –load-kmods configure –ldconfig=@/sbin/ldconfig.real –device=all –compute –utility –require=cuda>=10.0 brand=tesla,driver>=384,driver<385 brand=tesla,driver>=410,driver<411 –pid=9821 /home/dlfour/dockerdata/docker/overlay2/814a65fbfc919d68014a6af2c3d532216a5a622e5540a77967719fd0c695a0cb/merged]////nnvidia-container-cli: requirement error: unsatisfied condition: brand = tesla////n///”/””: unknown.
仔细看了一下,最新版的Tensorflow GPU Docker 容器需要的是CUDA>=10.0,这台机器是9.2,并不符合,两种解决方案,一种是升级CUDA到10.x版本,但是我暂时不想升级,google了一下,发现这个tag版本可用cuda9.x:1.12.0-gpu ,所以重新拉取Tensorflow相应版本的镜像:
docker pull tensorflow/tensorflow:1.12.0-gpu
运行:
docker run –gpus all -it tensorflow/tensorflow:1.12.0-gpu bash
没有什么问题:
|
root@c5c2a21f1466:/notebooks# ls1_hello_tensorflow.ipynb 2_getting_started.ipynb 3_mnist_from_scratch.ipynb BUILD LICENSE root@c5c2a21f1466:/notebooks# python Python 2.7.12 (default, Dec 4 2017, 14:50:18) [GCC 5.4.0 20160609] on linux2 Type “help”, “copyright”, “credits” or “license” for more information.>>> import tensorflow as tf>>> tf.__version__’1.12.0′>>> sess = tf.Session(config=tf.ConfigProto(log_device_placement=True))2019-08-15 09:52:29.179406: I tensorflow/core/platform/cpu_feature_guard.cc:141] Your CPU supports instructions that this TensorFlow binary was not compiled to use: AVX2 FMA2019-08-15 09:52:29.376334: I tensorflow/core/common_runtime/gpu/gpu_device.cc:1432] Found device 0 with properties: name: GeForce GTX 1080 Ti major: 6 minor: 1 memoryClockRate(GHz): 1.582 pciBusID: 0000:05:00.0 totalMemory: 10.92GiB freeMemory: 6.20GiB2019-08-15 09:52:29.527131: I tensorflow/core/common_runtime/gpu/gpu_device.cc:1432] Found device 1 with properties: name: GeForce GTX 1080 Ti major: 6 minor: 1 memoryClockRate(GHz): 1.582 pciBusID: 0000:06:00.0 totalMemory: 10.92GiB freeMemory: 6.68GiB2019-08-15 09:52:29.702166: I tensorflow/core/common_runtime/gpu/gpu_device.cc:1432] Found device 2 with properties: name: GeForce GTX 1080 Ti major: 6 minor: 1 memoryClockRate(GHz): 1.582 pciBusID: 0000:09:00.0 totalMemory: 10.92GiB freeMemory: 6.67GiB2019-08-15 09:52:29.846647: I tensorflow/core/common_runtime/gpu/gpu_device.cc:1432] Found device 3 with properties: name: GeForce GTX 1080 Ti major: 6 minor: 1 memoryClockRate(GHz): 1.582 pciBusID: 0000:0a:00.0 totalMemory: 10.92GiB freeMemory: 6.68GiB2019-08-15 09:52:29.855818: I tensorflow/core/common_runtime/gpu/gpu_device.cc:1511] Adding visible gpu devices: 0, 1, 2, 32019-08-15 09:52:30.815240: I tensorflow/core/common_runtime/gpu/gpu_device.cc:982] Device interconnect StreamExecutor with strength 1 edge matrix:2019-08-15 09:52:30.815280: I tensorflow/core/common_runtime/gpu/gpu_device.cc:988] 0 1 2 3 |
感兴趣的同学还可以尝试Jupyte Notebook版本的镜像,通过端口映射运行,然后就可以通过浏览器测试和学习了。
转载请注明:小猪云服务器租用推荐 » gpu云服务器使用Docker部署深度学习环境(中)